
No products in the cart.
Car Fitting: Essential Guide for Perfect Vehicle Setup
by iverol
When Sarah purchased her first SUV last spring, she assumed everything would work perfectly right out of the dealership. But after a week of uncomfortable drives and rattling accessories, she realized that proper car fitting wasn't just about sliding the seat forward and adjusting the mirrors. Whether you're installing protective covers, mounting tech accessories, or ensuring your family's safety with child seats, understanding car fitting transforms your vehicle from a basic transportation tool into a personalized space that truly serves your needs. This comprehensive guide walks you through everything from basic adjustments to advanced accessory installation, helping you create the perfect automotive environment.
Understanding the Fundamentals of Car Fitting
Car fitting encompasses far more than many drivers realize. It's the complete process of adjusting, installing, and customizing your vehicle's components to match your specific requirements, body dimensions, and lifestyle needs.
The term spans multiple categories, each equally important for your driving experience. Physical adjustments like seat positioning, steering wheel angle, and mirror placement form the foundation. Then comes accessory installation, where floor mats, seat covers, phone mounts, and storage solutions need precise fitting. Safety equipment, particularly child safety seats, demands meticulous attention to detail.
Why Proper Fitting Matters
Safety comes first. Incorrectly positioned seats can compromise airbag effectiveness. Loose accessories become projectiles during sudden stops. Improperly installed child seats reduce protection by up to 70% according to safety studies.
Comfort follows closely behind. Poor ergonomic setup leads to:
- Neck and shoulder pain during long drives
- Lower back stress from incorrect lumbar support
- Arm fatigue from poorly positioned steering wheels
- Eye strain from misaligned mirrors
Performance and efficiency also benefit from proper car fitting. When everything sits where it should, you react faster to road conditions, maintain better vehicle control, and even improve fuel economy through reduced drag from well-fitted external accessories.
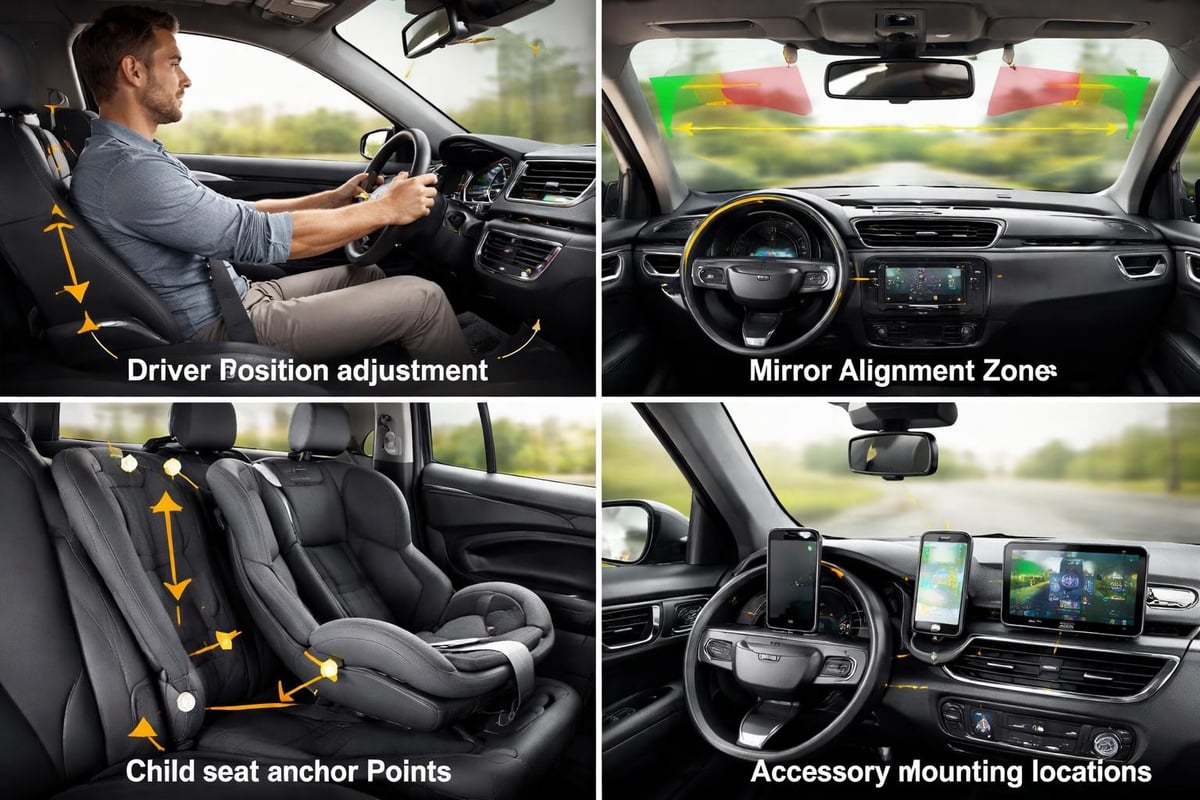
Driver Position and Control Adjustments
The foundation of car fitting starts with you, the driver. Your relationship with the vehicle's controls determines everything else.
Seat Position Optimization
Start with seat height. Your eyes should align with the center of the windshield, providing maximum visibility without straining your neck. Too low creates blind spots; too high leaves insufficient headroom for safety.
Distance from the pedals requires precision. With your back against the seat, your knee should maintain a slight bend (about 120 degrees) when the pedal is fully depressed. This position prevents leg fatigue and ensures quick reaction times.
Seatback angle affects both comfort and safety. Aim for 100-110 degrees from the seat cushion. Reclining too far reduces airbag effectiveness and control responsiveness. Too upright creates pressure points that cause discomfort.
| Adjustment Point | Correct Position | Common Mistake | Result of Error |
|---|---|---|---|
| Seat Height | Eye center at windshield midpoint | Too low/hunched | Reduced visibility, neck strain |
| Distance | Slight knee bend at full pedal press | Too close/far | Reduced control, leg fatigue |
| Backrest Angle | 100-110 degrees | Too reclined | Airbag ineffectiveness |
| Lumbar Support | Fills lower back curve | Too pronounced | Back pain, pressure points |
Steering Wheel and Mirror Setup
Your steering wheel should allow a slight elbow bend when your hands rest at the 9 and 3 o'clock positions. Modern vehicles often provide both tilt and telescoping adjustments for the perfect car fitting.
Mirrors require the "blind spot minimization" technique. The CarFit program recommends adjusting side mirrors until you barely see your vehicle's edges, maximizing peripheral coverage without gaps.
Installing Interior Accessories and Components
Interior car fitting transforms functionality and protection. Each accessory demands specific installation knowledge for optimal performance.
Floor Mats and Cargo Liners
Floor protection seems straightforward until you encounter an improperly secured mat sliding under the brake pedal. Quality floor mats feature retention clips, heel pads, or custom ridges that lock them into position.
Installation steps:
- Remove factory mats completely and vacuum the floor area
- Identify retention clips or attachment points in your vehicle
- Align mat positioning tabs with vehicle anchors
- Press firmly until you hear or feel the connection click
- Test by attempting to slide the mat forward with your foot
Cargo liners follow similar principles but require attention to sidewall coverage and raised edges that contain spills. Measure your cargo area before purchasing to ensure complete coverage without interference with seat folding mechanisms.
Seat Covers and Protectors
The car care solutions market offers countless seat cover options, from universal-fit to custom-tailored versions. Custom-fit covers provide superior protection and appearance but demand careful installation.
Start with headrest removal on most vehicles (check your manual for specific instructions). Slide the cover over the seat back from top to bottom, working out wrinkles as you progress. Secure straps underneath the seat, pulling tight enough to eliminate bunching but not so tight that seams strain.
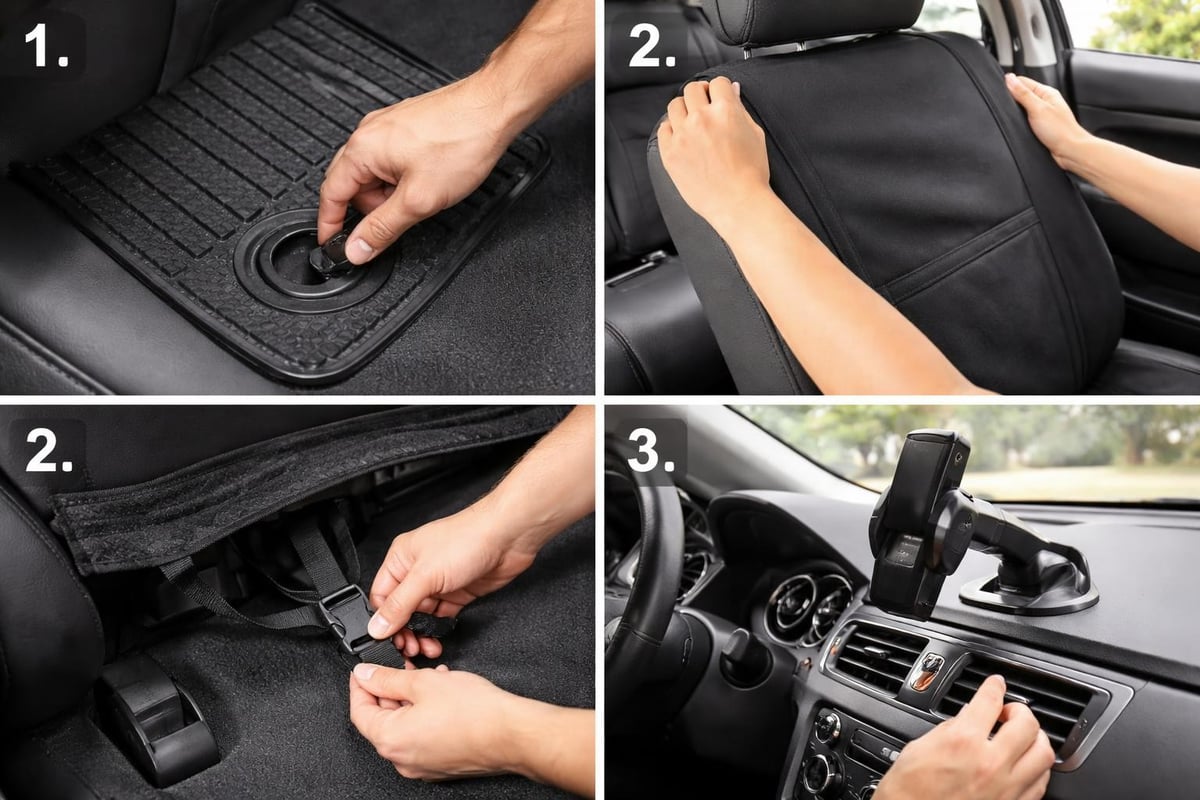
Technology Mounts and Organizers
Phone mounts, tablet holders, and organizers require strategic placement that maintains safety while enhancing functionality. Dashboard and windshield mounts must not obstruct critical sight lines or airbag deployment zones.
Test any mount by simulating emergency braking. If the device or mount shifts, vibrates excessively, or seems unstable, reposition it. The center console area often provides the most stable mounting surface for heavier devices.
Child Safety Seat Installation and Fitting
Child safety represents the most critical aspect of car fitting. The comprehensive guidance from Children’s Nebraska emphasizes that proper installation can mean the difference between minor injuries and life-threatening trauma.
Understanding LATCH Systems
Lower Anchors and Tethers for Children (LATCH) systems standardize installation across vehicles manufactured after 2002. However, weight limits apply. Many LATCH systems support children up to 65 pounds (combined child and seat weight), after which seat belt installation becomes necessary.
Locate the lower anchors by feeling between the seat back and cushion. Metal bars sit recessed in this gap. Top tether anchors appear behind the rear seat, marked with a child-in-seat symbol.
Installation Process
Correct car fitting for child seats requires patience and muscle. Place the seat on the vehicle seat, thread LATCH connectors or seat belt through the correct path (check your seat's manual), and tighten aggressively.
The "one-inch rule" tests proper installation. Grab the seat at the belt path and attempt to move it side to side and front to back. Movement exceeding one inch indicates insufficient tightness. Most parents don't pull tight enough initially.
Critical checking points:
- Recline angle matches the indicator on the seat side
- Harness straps thread through slots at or below shoulder level (rear-facing) or at or above (forward-facing)
- Chest clip positioned at armpit level
- Harness tight enough that you cannot pinch excess webbing at the shoulder
- Top tether connected (for forward-facing seats)
External Accessories and Protection Fitting
Exterior car fitting protects your investment from environmental damage while potentially enhancing aesthetics and aerodynamics.
Car Covers and Their Proper Fit
Generic covers disappoint because they don't account for mirror styles, antenna positions, or body contours. Custom-fit options from specialized manufacturers like those featured on FitMyCar use your exact make, model, and year to create precise patterns.
Proper car fitting with covers means complete coverage without excess fabric that collects water or flaps in wind. Mirror pockets should encapsulate side mirrors without stretching. The bottom hem needs to extend slightly below the rocker panels without dragging on the ground.
Application requires two people for vehicles larger than compact sedans. Start at the front, draping over the hood and aligning the windshield area. Work backward, smoothing wrinkles and ensuring antenna grommets align properly. Secure with provided straps or elastics, creating enough tension to prevent billowing without stressing seams.
Body Kits and Aerodynamic Components
While body kits often require professional installation, understanding car fitting principles helps evaluate quality work. Gaps between kit components and factory body panels should measure consistently, typically between 3-5mm. Wider gaps suggest poor fitting or low-quality molds.
Alignment matters tremendously. Front lip spoilers must sit parallel to the ground when the vehicle is at normal ride height. Side skirts should follow the rocker panel line without sagging at either end. Rear diffusers need precise alignment with exhaust outlets.
| Component Type | Fitting Priority | Common Issue | Solution |
|---|---|---|---|
| Front Lip Spoiler | Ground clearance, symmetry | Scraping, uneven gaps | Height adjustment, shimming |
| Side Skirts | Panel alignment, stability | Sagging ends | Additional mounting points |
| Rear Diffuser | Exhaust alignment, level fit | Melted edges, vibration | Heat shields, reinforcement |
| Hood Vents | Water sealing, aesthetic flow | Leaks, misalignment | Gasket replacement, remounting |
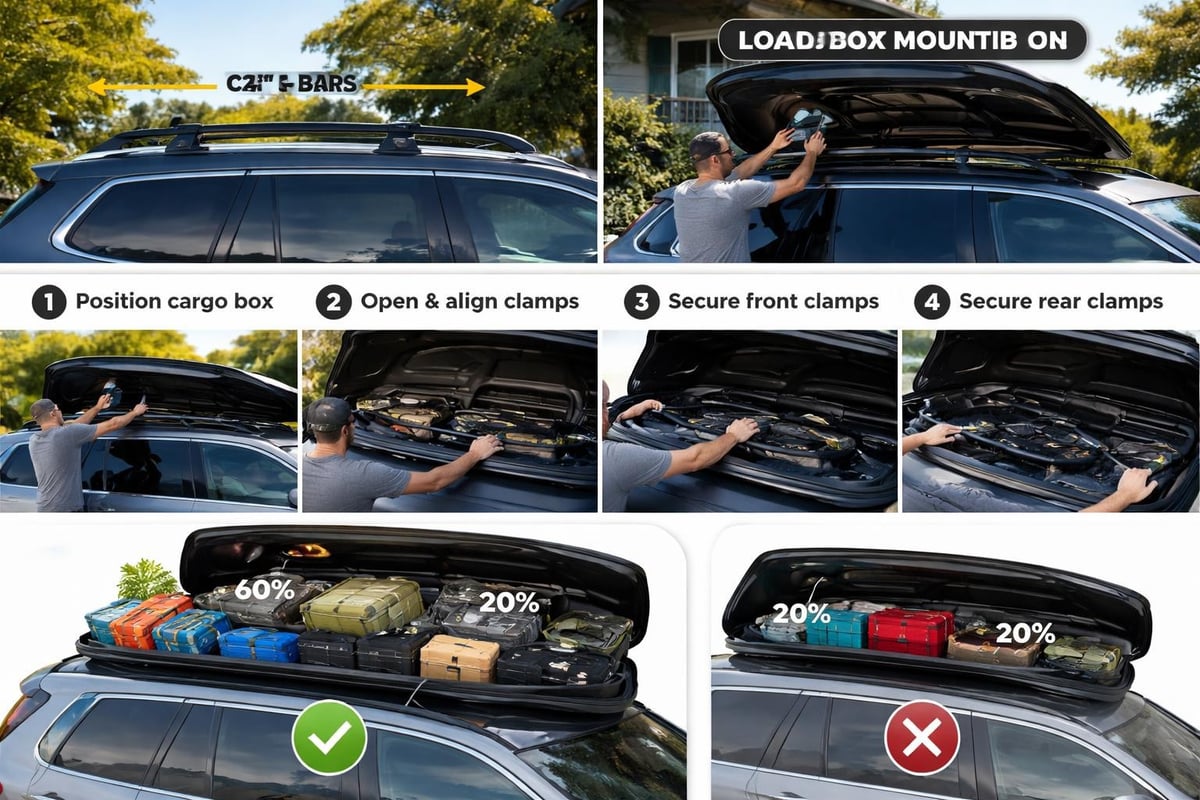
Roof Racks and Cargo Systems
Roof-mounted cargo solutions demand the most attention to car fitting since improper installation creates safety hazards and fuel economy penalties.
Crossbar Installation
Factory roof rails simplify crossbar installation, but aftermarket systems require precise measurements. Crossbars must sit perpendicular to the vehicle's centerline and parallel to each other. Even a small angle creates wind noise and reduces load capacity.
Measure from the windshield to each crossbar mounting point on both sides. Distances should match within a quarter-inch. Tighten mounting hardware to manufacturer specifications using a torque wrench. Over-tightening cracks mounting feet; under-tightening allows shifting during travel.
Cargo Box and Bike Rack Fitting
Cargo boxes mount to crossbars using U-bolts or specialized clamps. Position the box as far forward as possible while maintaining at least four inches of clearance from the windshield. This placement minimizes wind resistance and noise.
Test the mounting by attempting to slide the box along the crossbars and lift the rear. Properly fitted boxes shouldn't budge. Recheck torque after 50 miles of driving as vibration can loosen connections.
Specialized Fitting Considerations
Certain modifications require knowledge of specialized techniques that separate amateur attempts from professional results.
Custom Modifications and Frenching
The art of frenching represents advanced car fitting where components are recessed into body panels for a seamless appearance. While most drivers won't tackle this themselves, understanding the concept helps appreciate quality custom work.
Modern frenching applications include recessed license plate frames, flush-mounted antennas, and integrated lighting. Professional execution requires metal fabrication skills and precise measurements to maintain structural integrity.
Performance Parts Installation
Performance air intakes, exhaust systems, and suspension components all involve critical car fitting elements. Intake systems must seal completely at connection points to prevent unmetered air from entering the engine. Even small gaps reduce performance and can trigger check engine lights.
Exhaust fitment focuses on proper hanger engagement and tip positioning. Tips should sit centered in bumper cutouts with uniform spacing all around. Hanging too low creates ground clearance issues; too high looks unfinished.
Maintaining Proper Fit Over Time
Car fitting isn't a one-time event. Regular checks ensure accessories remain secure and adjustments stay optimized.
Seasonal Adjustments
Temperature changes affect materials differently. Rubber floor mats expand in heat and contract in cold. Check retention clip engagement quarterly, especially after seasonal transitions. Seat covers may require re-tightening as materials stretch or shrink.
Winter car fitting includes ensuring remote starters don't interfere with factory systems and that block heater cords route safely without pinching. Summer preparations mean verifying sunshades fit snugly and windshield covers secure properly.
Inspection Schedule
Create a monthly car fitting inspection routine:
- Week 1: Check floor mat security and seat positioning
- Week 2: Inspect child safety seat tightness and harness fit
- Week 3: Examine exterior accessories for looseness or damage
- Week 4: Test technology mounts and cable management
After long trips or off-road adventures, conduct additional checks since vibration and jostling can loosen connections.
Professional vs. DIY Fitting
Understanding when to handle car fitting yourself and when to seek professional help protects both your safety and investment.
DIY-Friendly Projects
Most interior accessory installation falls within average skill levels. Floor mats, seat covers, organizers, and basic tech mounts require only patience and attention to detail. Following manufacturer instructions carefully yields professional results.
The automotive accessories selection available today includes increasingly user-friendly designs with tool-free installation or minimal hardware requirements.
Professional Installation Recommended
Complex projects justify professional expertise:
- Permanent body modifications or frenching work
- Electronics integration with factory systems
- Performance modifications affecting emissions
- Structural changes like roll bar installation
- Advanced audio system integration
Many retailers offer installation services or can recommend certified installers. The cost often prevents expensive mistakes and ensures warranty protection.
Common Fitting Mistakes and How to Avoid Them
Learning from others' errors saves time, money, and potential safety issues.
Rushing the process tops the list. Proper car fitting demands patience. Taking shortcuts during child seat installation or skipping test-tightening steps creates dangerous situations.
Ignoring weight ratings causes failures. Roof racks, cargo boxes, and even seat covers have maximum capacity specifications. Exceeding limits damages components and creates hazards.
Using wrong mounting points occurs frequently with aftermarket accessories. Just because a bolt hole exists doesn't mean it's designed for accessory mounting. Consult vehicle-specific forums or professional installers when uncertain.
Forgetting seasonal changes means summer-installed accessories may not perform well in winter conditions. Consider temperature ranges and weather exposure when selecting and installing products.
Overlooking interference happens when new accessories interact poorly with existing components. Test all vehicle functions after installation, including seat movements, airbag indicator lights, and trunk operation.
Mastering car fitting transforms your vehicle into a personalized, safe, and efficient space that serves your specific needs while protecting your investment for years to come. Whether you're adjusting driver controls for optimal comfort, installing protective accessories, or ensuring child safety seats provide maximum protection, the attention you give to proper fitting directly impacts your daily driving experience. When you're ready to enhance your vehicle with quality accessories designed for proper fit and lasting performance, Iverol LLC offers carefully curated car care products and automotive accessories that combine functionality with durability, helping you maintain and protect your vehicle with confidence.
Further reading

Leave a comment